
Installation
WENDLab Gauge Installation Instructions
Installing your gauge is relatively simple, but depending on your ECU and your skill level, it might be a job best left to a professional. If you attempt to do this yourself, you're accepting responsibility for installing it correctly with your application.
Haltech
Click here for Haltech Installation Instructions
Link
Click here for Link Installation Instructions
Emtron
Click here for Emtron Installation Instructions
ECUMaster Black
Click here for ECUMaster Black Installation Instructions
General Installation Notes for advanced users
Wiring
The socket on the back of your WENDLab gauge is a Deutsch DTM04-4P that accepts a DTM06-4S plug.
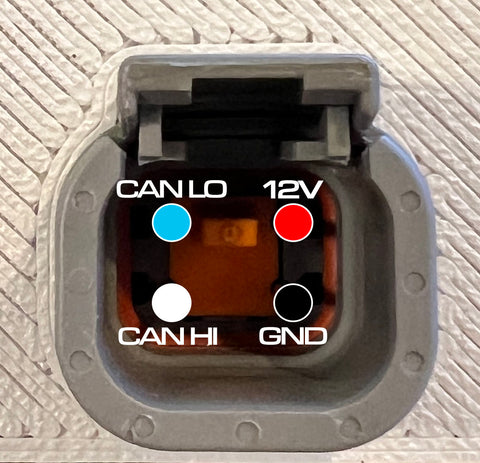
If you'd like to build a custom cable for your installation, the industry standard DTM06-4S connector you need is available on amazon and electronics retailers. (Here's a link to some plug and pin sets on amazon) The connectors come in two different varieties -- a less expensive foldover/open barrel crimp version that you can use a standard, inexpensive terminal crimper on or a more expensive solid contact that requires a specialized crimper (Here's an amazon link to a decent one). Use a 20AWG wire in these connectors. For CAN cables on short runs, you don't need to twist the CAN HI and CAN LO wires, but it's recommended for longer runs. It accepts 12v power and Ground to run the device. The ground does not need to be a sensor ground to the ECU.
WENDLab gauges come with a 120ohm terminating resistor that can be disabled by removing a jumper on the controller board (there's only one on the board). It shouldn't be necessary to remove this, but in some complex installations, you may need to.
ECU Configuration
WENDLab gauges are capable of operating at 1MBps or 500kBps data rates (this is configurable in the app) and supports a variety of ECU CAN protocols.